

Getting Started with RPG Smart Pages
This section will
take you through installing RPGsp, configuring RPGsp, and building a simple browser
application.
The RPGsp IDE is a PC-based development environment. The latest version of the RPGsp IDE can be downloaded from http://www.profoundlogic.com/rpgsp_download.html. The installation is similar to that of any other PC-based product.
Once the IDE is installed, you should launch the program to continue.
Next, RPGsp will try to connect to your iSeries. If this is the first time you have launched the IDE, RPGsp will prompt you to fill out an iSeries profile. You must provide the iSeries IP Address or Host Name, your User Id, and your Password. Other parameters may be left as their default values.
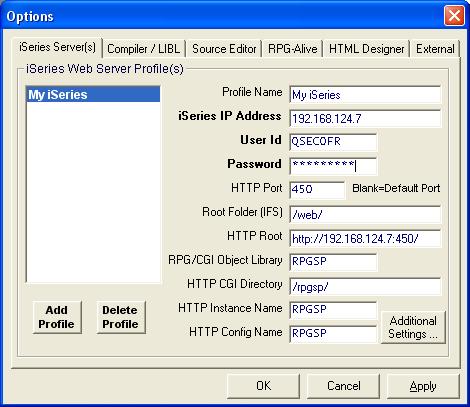
After your click OK, RPGsp will try to establish the connection. RPGsp uses the iSeries FTP server to communicate with the iSeries. You must make sure that the FTP server is started. If RPGsp is unable to connect, it will be due to one of the following reasons:
Assuming the connection is successful, RPGsp will check to see if an RPGsp software key has been applied to your iSeries. If a key is not found, you will be prompted to fill out a form to request a 30-day trial key from Profound Logic Software, Inc.
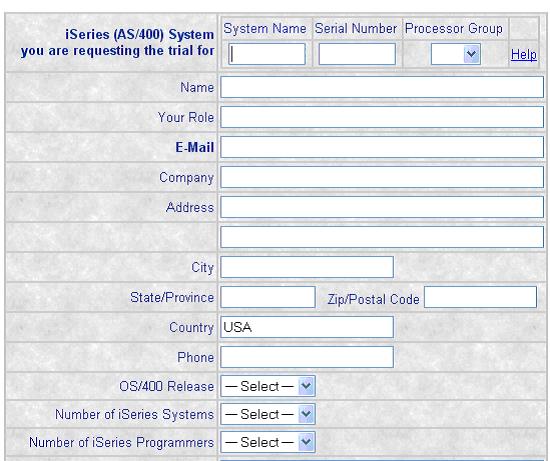
Your iSeries system information will be pre-filled. The software key will be emailed to you soon after you fill out the form. This key is specific to your iSeries system. It will unlock the full functionality of the software for 30 days.
You will apply the software key by executing two iSeries commands (CRTDTAARA and CHGDTAARA). You should copy and paste the exact commands from your email. The key will be placed in library QGPL. After executing the commands, close the IDE and restart it. RPGsp will then reconnect to your iSeries and verify the software key.
Unless RPGsp components are already installed on your iSeries, the next step is to install and test RPG Smart Pages on the iSeries server. If you are not automatically prompted to do this, you can select Tools --> Configure Server -> Install and Test RPG Smart Pages from the pull-down menu.

First, ensure that you are using a user profile with sufficient authority. Then select
the desired HTTP server instance type. RPGsp supports both the traditional or classic
HTTP server and the Apache HTTP server. Both types come with the OS/400 operating
system. If your operating system version is prior to V5R1, you must select classic.
Once you click install, RPGsp will upload the necessary objects to the iSeries and try to launch the HelloWorld page. If the HelloWorld page launches without problems, the installation was successful.
What components
are installed?
Library for dynamic pages (or CGI programs)
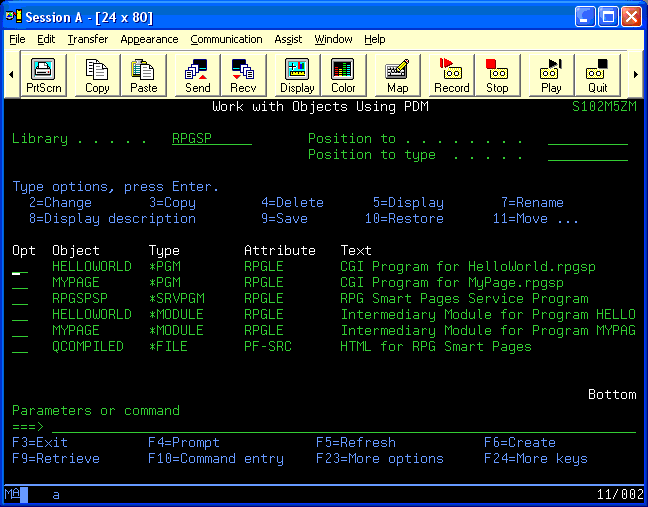
A library for RPG Smart Pages is created. The name of the library will be RPGSP unless you have specified a different name in your iSeries Profile. At first, this library will contain a service program called RPGSPSP and a source file called QCOMPILED.
As you compile pages, new objects will be placed into the library. For example, if you create and compile an RPG Smart Page called MyPage, the library will have a new module and a new program called MYPAGE.
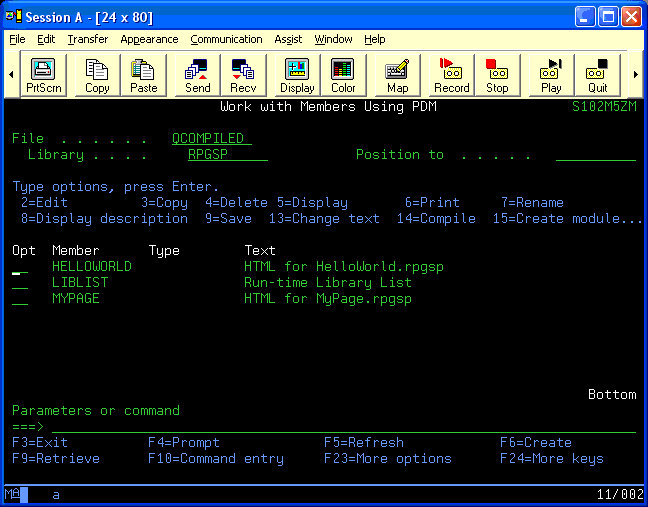
The QCOMPILED file, in turn, will have a new source member by the name of
MYPAGE.
Please note: the original source code for your RPG Smart Page is not placed
into the library. You should save your source separately either to the IFS, to your
PC, to your Local Area Network, or as a Library Source Member in a source file with
a long record length. This is done by selecting the Save option from the File menu
or by clicking the save icon on the toolbar. The save dialog will have three tabs.
The tabs represent different types of file systems: the IFS, the Local PC, and the
Library file system.
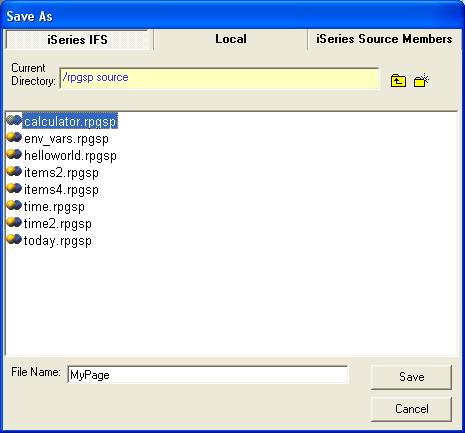
If you intend to save your RPG Smart Page documents as source members, you must create the QRPGSPSRC file with a record length big enough to ensure that long HTML lines do not get cut off. Here is an example of a command that would create such a source file:
CRTSRCPF FILE(RPGSP/QRPGSPSRC) RCDLEN(240)
You may wish to use a record length that is even longer than 240; but be aware, members with record lengths over 240 cannot be viewed or edited in SEU.
The installation process also creates a folder on the IFS for serving static html pages. The name of the folder will be "/web" unless you have specified a different name in your iSeries profile.
Static pages can't contain any RPG code -- just HTML. The most commonly used extension for static pages is ".html". Index.html will be your home page.
In addition to static HTML pages, you can place images, cascading style sheet files, javascript files, and the like into this folder. You may want to create several subfolders. For example, images could go into the "/web/images" folder.
After creating the RPGSP library for dynamic pages and the "/web" IFS folder for static pages, RPGsp will create an HTTP server instance and start it up. On the iSeries, all HTTP instances use a configuration file. RPGsp will automatically create this file for you. The name of this file, as well as the name of the HTTP server instance, will be RPGSP, unless you specify different names in your iSeries profile.
The configuration file will contain a few simple directives telling the server to use library RPGSP for dynamic (CGI) content and folder "/web" for static content. If, in the future, you decide to implement some of the more advanced HTTP server features like SSL, password-protected directories, access logs, error logs, and the like, you will need to modify your configuration file. There are several ways to do this from the RPGsp Environment.
When the HTTP server instance is started, you will see it as an active job on your iSeries system. You can use WRKACTJOB or WRKSBSJOB QHTTPSVR to find the HTTP server jobs. These commands are used often to investigate HTTP server issues and to debug RPGsp pages.
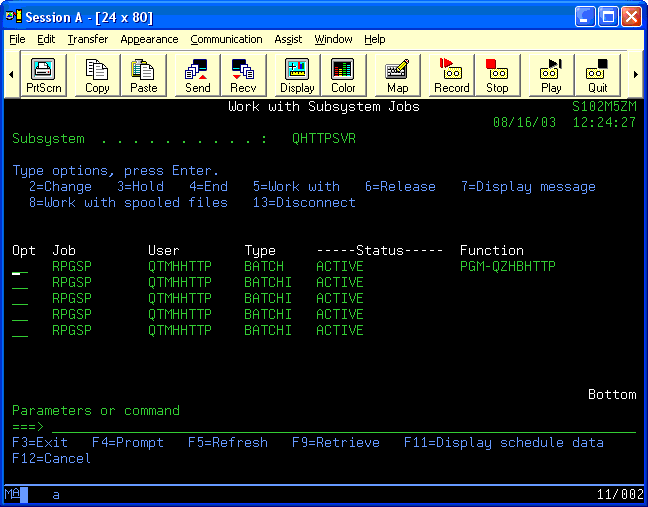
Because the HTTP server instance is multi-threaded, you will see several jobs. Any one of these jobs could be serving up browser content to users.
The manual commands to start and end the HTTP server instance are:
STRTCPSVR SERVER(*HTTP) HTTPSVR(RPGSP)
ENDTCPSVR SERVER(*HTTP) HTTPSVR(RPGSP)
What if HelloWorld doesn't launch?
If the HelloWorld page doesn't compile, check to see whether the RPG/CGI library was created. Make sure it contains the RPGSPSP service program and the QCOMPILED source file. You can try recreating the library by selecting Tools -> Configure Server -> Configure RPG CGI Object Library. Also make sure you have the appropriate authorities to compile into the library.
If HelloWorld compiles but the browser gives you an error when you launch the page, the problem could be related your HTTP server configuration.
First, make sure the HTTP server is started. Use command WRKSBSJOB QHTTPSVR to see if the RPGSP instance jobs are running.
Your HTTP configuration file directives must match the settings of your RPGsp iSeries profile. If you suspect that they do not match, you can try recreating the RPGSP instance and configuration file by selecting Tools -> Configure Server -> Create HTTP Server Instance.
In addition, make sure the following user profiles are enabled on your system:
Use the following command to find these profiles: WRKUSRPRF QTMH*
After making changes, try compiling and launching the HelloWorld program again.
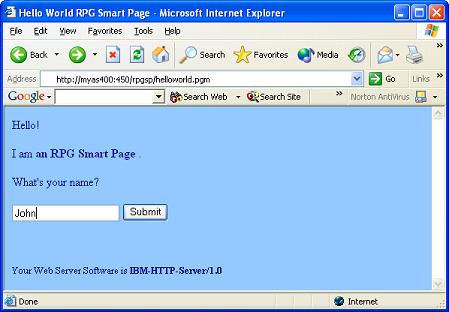
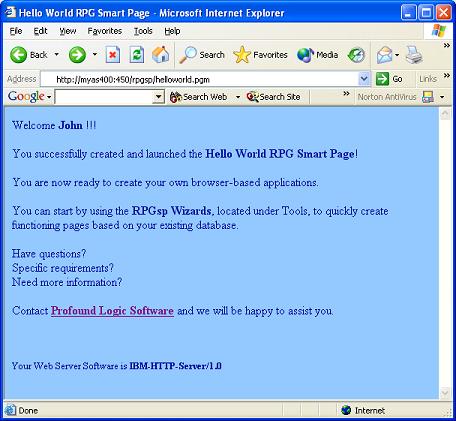
Here is what it should look like:
In this section, we will show you how to create a simple application. Actually, the application will be quiet sophisticated by traditional standards. But it will be simple to create within the RPGsp Development Environment because we are going to use Wizards, which will build most of the code for us. The application is going to be a complete File Maintenance HTML Subfile.
We will use the Item Master File in the following illustrations, but you should choose a database file that you are familiar with on your system. The file should be a uniquely keyed physical or logical file. After you decide which file to use, open the Database Repository by selecting it from the View Menu or by clicking on the Database Repository icon on the Toolbar.
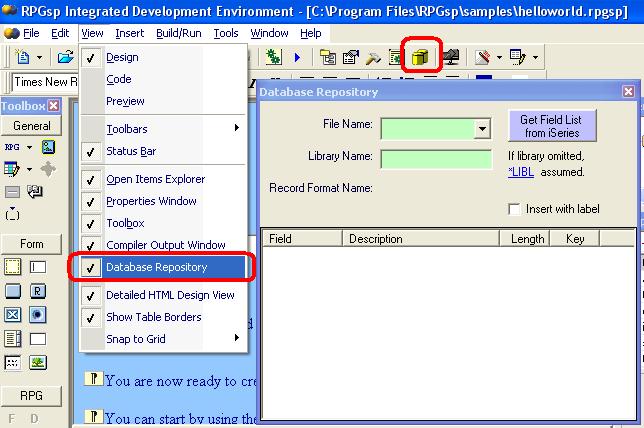
The Database Repository window will ask for a file name and a library name. Type in the file name, but leave the library blank. Instead of specifying the library, click on the *LIBL link to specify a Library List.
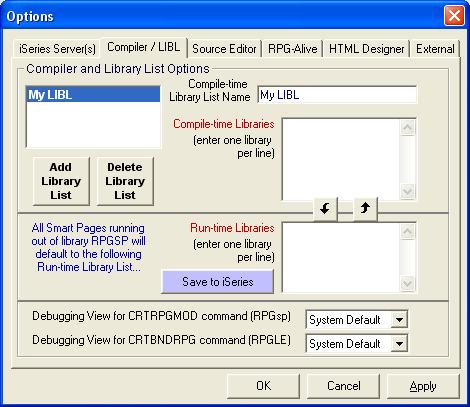
You will really specify two Library Lists: a compile-time library list and a run-time library list. The first library list is used by the Development Environment for compiling. You can maintain several compile-time library lists and switch between them when necessary. The second library list is actually saved to the iSeries. It is used to by your application when it is being launched. Most of the time, you will want to keep the two library lists the same. You will find convenient arrows to copy one library list to another. The runtime library list will be saved as a member called LIBLIST in the QCOMPILED source file.
It is not necessary to put the RPGSP library into the library list. Your library list should contain the library of your database file(s). If you leave the run-time library list blank or specify *JOBD, the library list of the HTTP Server Job Description will be used. After specifying your library lists, click Ok to return to the Database Repository.
Now click on the Get Field List from iSeries button. RPGsp will automatically load the file fields.
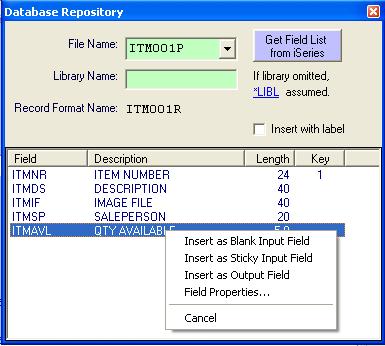
Next, you will build the label, the output HTML, and the input HTML for each field.
This step is not necessary. If you omit this step, RPGsp will simply use database field headings for labels, plain text for output, and textboxes for input. Often, this is exactly what you want. But if you would like to get fancy (checkboxes, images, list boxes, edit codes, etc.), click on the desired field and select the "Field Properties" option.

On the right side, you will see selection boxes that will automatically build the appropriate HTML (and RPG) code for output fields and input fields. You will notice two types of input HTML:
After customizing the repository, select Tools -> Create HTML Subfile from the pull-down menu.

Type in the Document
Name and Title. Then select a theme.

A theme is the look of your application. Themes use HTML templates to determine colors, fonts, any images, etc. RPGsp comes with a number of predetermined themes.
Select your file and the fields you want displayed on the subfile page.
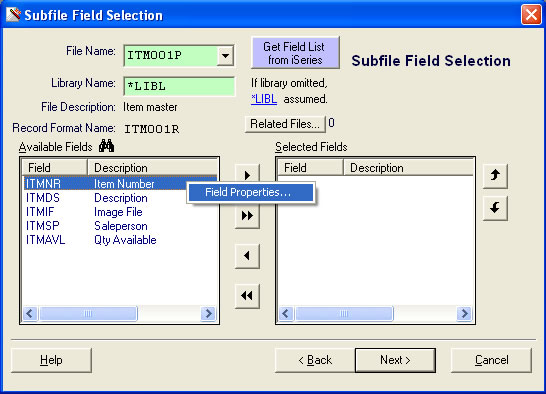
Click Next. You
will then be prompted to specify additional details about your subfile.
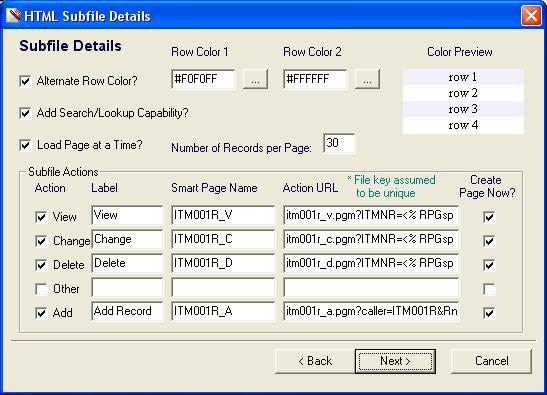
By default, the wizard will alternate the data row color, produce a lookup box based
on the key of your file, add next & previous links for loading records one page
at a time, and create pages for Viewing, Changing, Deleting, and Adding a record.
Based on your choices, the wizard may ask you to make some more selections. You will have to select fields that will go on your View, Change, and Add record pages.
Once you have completed the wizard, several RPG Smart Pages will be generated for you. Before you proceed, you should compile and save the pages. You should be saving your work to either the iSeries IFS or to your Local drive. If you are saving to the iSeries, you will probably want to create a separate folder for RPGsp Source. Do not save your pages to the "/web" folder. If you do, your code may be exposed to end-users.
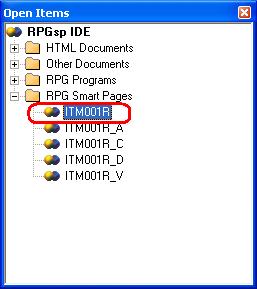
To test your application so far, select the main subfile page in the Open Items explorer, and then click on the "Launch" Icon.
 |
 |
The way an RPGsp subfile works is a little different from traditional AS/400 green-screen subfiles. The concept, however, is not hard to grasp.
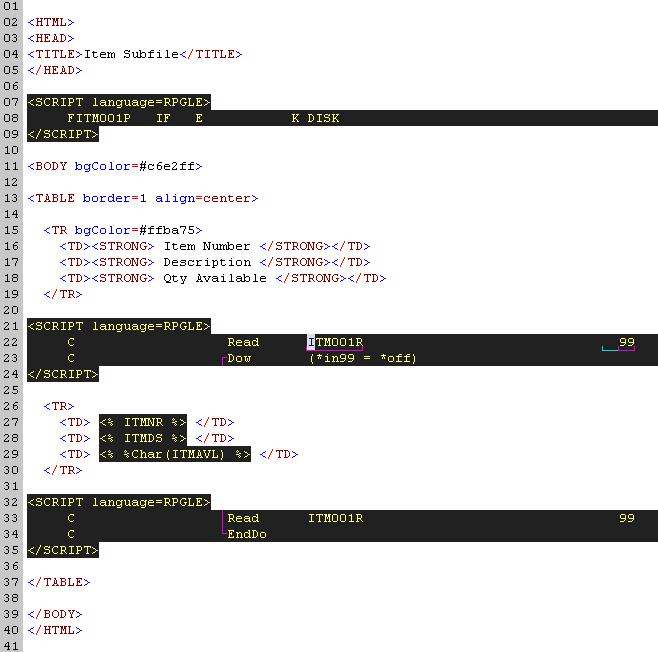
In design view, you can see and change the basic look of the subfile. When you switch to code view, you will notice several RPGLE scripts intermingled with the HTML. These scripts drive the dynamic logic of the page. The code is genuine native ILE RPG, but you will notice some additional flexibiilty and some extra functions.
For instance, the sequencing of the RPG specs is not as strict. You can have (F)ile and (D)efinition specs anywhere in the document. You can also embed sections of HTML within DO loops and IF statements. This is called conditional HTML and repeating HTML.
An HTML subfile is basically an HTML table row embedded within a Do-While loop. Here is an example of the code for a very simple subfile page.
To display dynamic content, you will use RPG variables and expressions, not RPGLE
scripts. For example, to display the Item Number field within your HTML content,
you would use <% ITMNR %>.
Numeric fields must first be converted to a characters with the %Char() or the %EditC() function. For example, the quantity available field would appear as <% %Char(ITMAVL) %>.
In addition, you will notice the use of several RPGsp-specific functions. You will see RPGspSave being used to save session variables. You will see RPGspIn being used to retrieve input. For more information on what the special functions do, position the cursor onto the function and press F1.
You can customize the look of your pages in RPGsp's design view. Other HTML designers can also be used.

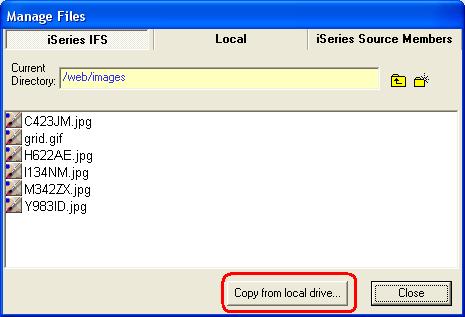
The built-in deign view is a full-featured designer that is capable of interfacing with the iSeries. To be recognized by the designer, external iSeries resources like css files and images should be copied to the "/web" folder on the IFS. You can use the RPGsp file manager to do this. To open the RPGsp file manager, click on the "manage files..." icon on the toolbar.
When images, links, or CSS files are inserted or used in the designer, a relative
URL is derived. For example, a link to the Home Page from any RPGsp page would come
out like this:
<A
href="../index.html">
Home </A>.
Not
like this: <A href="/web/index.html">
Home </A>.
Similarly, the HTML for an image stored in "/web/images" would be something like the following: <IMG src="../images/logo.gif">.
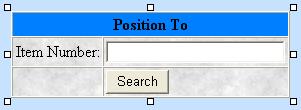
You will notice the designer makes it easy for you to insert, resize, move, and edit
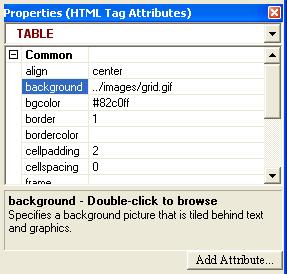
the content of HTML elements. In addition, each element will have a list of attributes.
These attributes can be maintained in the properties inspector window.
 |
 |
For additional attributes and options, right-click the HTML element. A pop-up menu
with more choices will appear:

In addition, you can use the Edit toolbar to format text and align HTML elements:
![]()
For additional page design functionality, you may wish to configure RPGsp to integrate with other designers like Macromedia DreamWeaver, Microsoft Visual Studio .NET, IBM WebSphere Development Studio Client, or Microsoft FrontPage. RPGsp allows to configure up to 4 external PC-based editors.
After your application is created, you may want to modify the logic to suit your needs. This is accomplished by changing the code. RPGsp is equipped with a full-featured RPG editor that should make any RPG developer feel right at home. The editing features include prompting, IF/ENDIF - DO/ENDDO matching, syntax highlighting, keyword auto-completion, and context-sensitive ILE RPG help.
Details on how to make various kinds of source code changes are described below. Please note, these are just a few examples. There is virtually no limit to the functionality that can be implemented with RPGsp.
The easiest way to validate user input is to locate the Validate subroutine. The Add Record and Change Record pages will automatically execute this subroutine for you. You can place RPG code to check the contents of input fields into this subroutine. You can refer to the input fields by their file field names, just like you would in a traditional RPG program. If user input is invalid, place an error message into the Msg variable. This will automatically display a message at the top of the page and re-prompt the user to enter the information again. Your field validation code can often be imported from existing green-screen data entry programs.
Setting
default values for a new record
Just like with field validation, this can be done through a special subroutine. Find a subroutine by the name of Defaults. Place your field initialization code there. This is accomplished in the same manner as with a traditional RPG program. Because sticky fields are used on the Add Record page, you only need to worry about initializing the RPG field names. The corresponding field values will automatically be loaded into the HTML form.
Adding fields and files to the
subfile page
To add a subfile field, first create a new column for it by right-clicking on a near-by cell and selecting the "Table -> Insert Column" option. Then, key in a column heading in the top cell. Highlight the heading and click on the "Bold" toolbar icon to make the heading bold. Next, place your cursor in the bottom cell and open the database repository. Find your desired field and click it. You will be presented with a few options. Select "Insert as Output Field". You have just inserted a new subfile field.
If your new field is coming from a different database file than what you selected originally in the subfile wizard, switch to code view and add a File declaration line (F spec) in the top-most RPGLE script. Then scroll down to the section of code that loads the subfile (the Do-While Loop). Insert the appropriate logic for retrieving records from the new file (usually just an RPG CHAIN statement).
For calculated fields, use the "Insert RPG variable or expression" option instead of the Database Repository.
Adding fields to the view record,
change record, and add record pages
First, insert a table row for the new field by right-clicking on a near-by cell and selecting "Insert Row". In the left cell of the new row, type in a field label. In the right cell, insert your new field from the database repository.

On the View Record page, use the "Insert as Output Field" option.
On the Change and Add Record pages, use the "Insert as Sticky Input Field" option. You will also need to add a line of code into the LoadFormData subroutine. This line of code will use the RPGspIn() function to transfer the form input to the field name.
To delete a subfile field, right-click the field and remove the entire table column.
To delete a field from the view record page, right-click the field and remove the table row.
On the add and change record pages, first remove the entire table row of that field. Then look in the LoadFormData subroutine to remove the code associated with that field.
Reusing
modules and service programs
If you have created modules or service programs that you would like to reuse in your browser application, you can package them into binding directories. The quickest way to create a binding directory is to issue the CRTBNDDIR BNDDIR(MYLIB/BNDDIRNAME) command, and then to use the WRKBNDDIRE BNDDIR(MYLIB/BNDDIRNAME) command to add your modules and service programs. In your RPGsp page, use the H spec to specify the binding directory...
![]()
Replace MYLIB with your own library name, and BNDDIRNAME with your own binding directory name. Do not use lower case.
As with traditional RPG programs, you will also have to declare a prototype for every ILE function you are going to use.
You can
also attach modules and service programs directly, without a binding directory.
This is done by setting the appropriate parameters under Tools -> Compile Command
Options. Compile command options can be set globally or on a document-by-document
basis.
As you are making changes to your RPGsp application, you can compile and test (or launch) the application at any time. If your application contains errors, you will see them in the compiler output window.

You can click on the error message to go to the problem area within your document. If you would like to see the entire compile listing, right-click on the compiler output window and select "View Compile Listing...".
When you compile an RPGsp page, an actual RPGLE program is generated. When you debug RPGsp applications using STRDBG or other iSeries (AS400) debugging tools, you will be working with this RPGLE program, and you will not see any HTML code. Entire sections of HTML will be represented with a single call to the RPGspHTML function.
You can view the generated RPGLE source by right-clicking the compiler output window and selecting the "View Generated Source..." option. This can be useful in resolving compile issues. It can also be used to gain an understanding of how RPG Smart Pages work.
Profound
Logic Software, Inc.
http://www.profoundlogic.com/
(937) 439-7925